Table of Contents
Time to Complete
4 minutes
Overview
Welcome to Career Key Central, the group administration portal for Career Key Discovery (CKD) and the Career Decision Profile (CDP)!
There are four main steps to getting up and running with Career Key Central.
- Set up and customize Career Key Central for your administrative users,
- Host a Career Key assessment web application plug in on your website,
- Invite your colleagues, and
- Invite your clients and discoverers
Takeaway
- Learn how to set up Career Key assessments (CKD, CDP, or both) and Career Key Central for your organization
Step 1: Set Up and Personalize Career Key
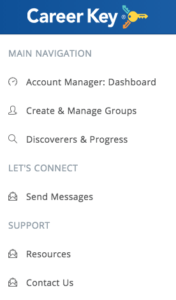
Start by personalizing Career Key Central for your organization. This exercise will help familiarize yourself with one of the two basic navigation sections of Career Key Central:
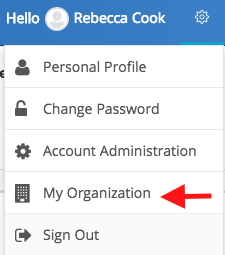
1. GEAR ICON: Account settings at the customer level, and “sponsored” organization level settings. Learn more about the group portal’s Account Hierarchy. A customer can have multiple organizations, but starts out with one default organization assigned to itself.
![]()
2. LEFT NAVIGATION: Main Dashboard navigation, primarily focused on discoverers or clients and their activities. Organizations using the CDP will see a slightly different menu.
You can add your organization’s logo to Career Key Central so your counselors and other colleagues feel more at home. Click on the Gear icon from the top right hand corner of the website and select My Organization.
You will automatically view the Organization Info tab.
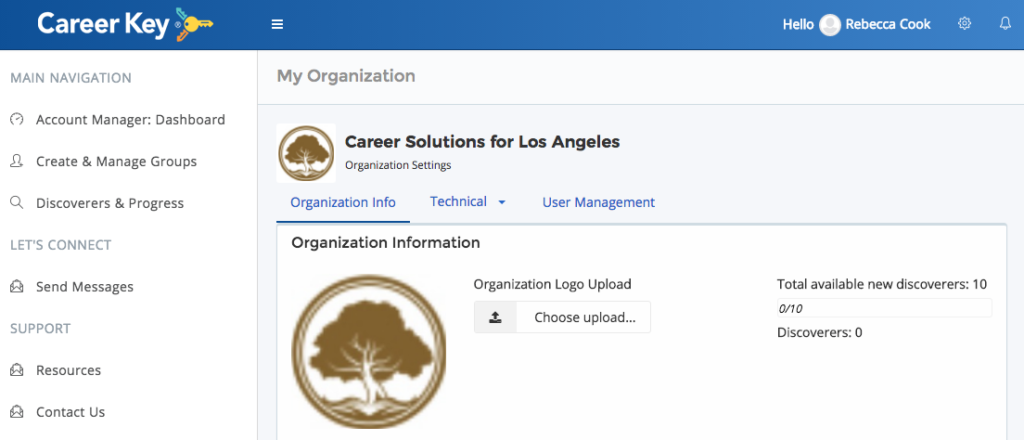
- If there is no organization logo image there or you want to change the image, click the Choose Upload button.
- Next, click on the folder icon and select a logo file from your computer. If it is a .png image, you may need to re-save it as a .jpg in order to use it.
- Move the white selection box where desired and click on Crop and Save.
Step 2: Host a Career Key Plug In on Your Website
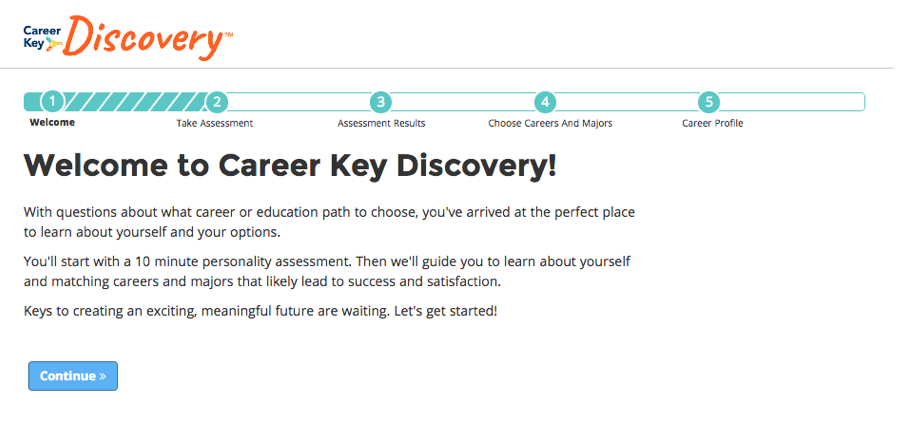
Both the CKD and CDP are designed to be added to your website using a web app “plug in.” A common plug in example is Google Maps on your favorite restaurant’s website. Ours is easy to set up, but requires that your site’s web administrator/technical contact add it for you. For example, the CKD plug in, once installed, looks like this to your discoverers:
Decide where and how to offer Career Key assessments to your discoverers
Before you invite your technical contact to install the plug in for you (See Step 3 Inviting Colleagues), decide on the following 3 things:
1. On what web page URL you want your clients/discoverers to see the plug in and start a Career Key assessment. This is where your technical contact will host the plug in;
2. Changes to any existing webpages to add a call to action or navigation to take and return to a Career Key assessment. Here are some examples for presenting Career Key assessments to individuals on your website:
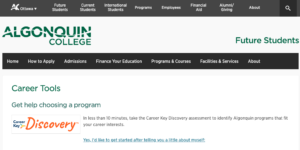
CKD for Admissions
Get help choosing a program
In 10 minutes, take the Career Key Discovery assessment to identify [your organization’s] programs that fit your career interests.
CDP for Career Services and Academic Advising
In 5 minutes or less, the Career Decision Profile (CDP) inventory takes a snapshot of where you are on your career decision journey and how you feel about it. You’ll receive a report with personalized results. Help us learn more about you so we can follow up with the right resources!
Other resources
Download and use our Career Key Discovery logo:
![]()
Download and use our Career Decision Profile logo:
![]()
3. How you want the plug in customized or configured, if you want something different than our default settings. Your Career Key customer success contact can help walk you through the options. In most cases, Career Key will take care of any customized configuration for you as part of the onboarding process.
Invite Your Technical Contact
Select the Gear Menu from the top right hand corner of the website and,
- Select My Organization.
- Select User Management tab.
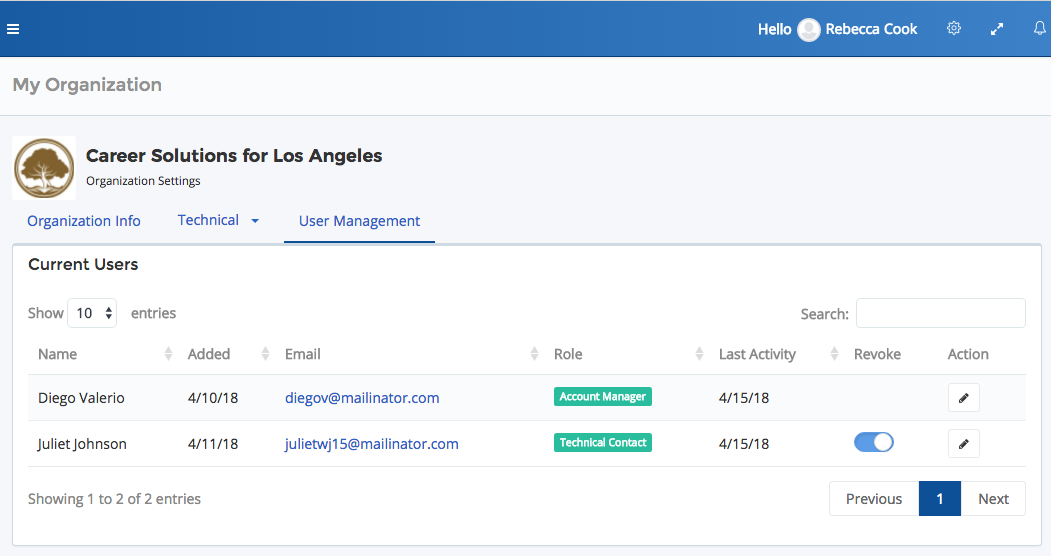
- Scroll down below current users.
- Under Invite User, add the email address for your Technical Contact.
- Select the Technical Contact check box.
- Customize the default email message with (a) where you want discoverers to see the plug in, and (b) what, if any, changes to the plug in configuration you’d like.

- Click Send Invite button.
Your Technical Contact will show up on the list of users when they’ve accepted your invite. We will email them instructions. They should inform you when a Career Key assessment has been added to your website and is ready to go.
Step 3: Invite Your Colleagues
Career Key Central allows you to invite different types of users: counselors and your technical contact. They’re all invited using the same simple process.
Select the Gear Menu from the top right hand corner of the website and,
- Select My Organization.
- Select User Management tab.
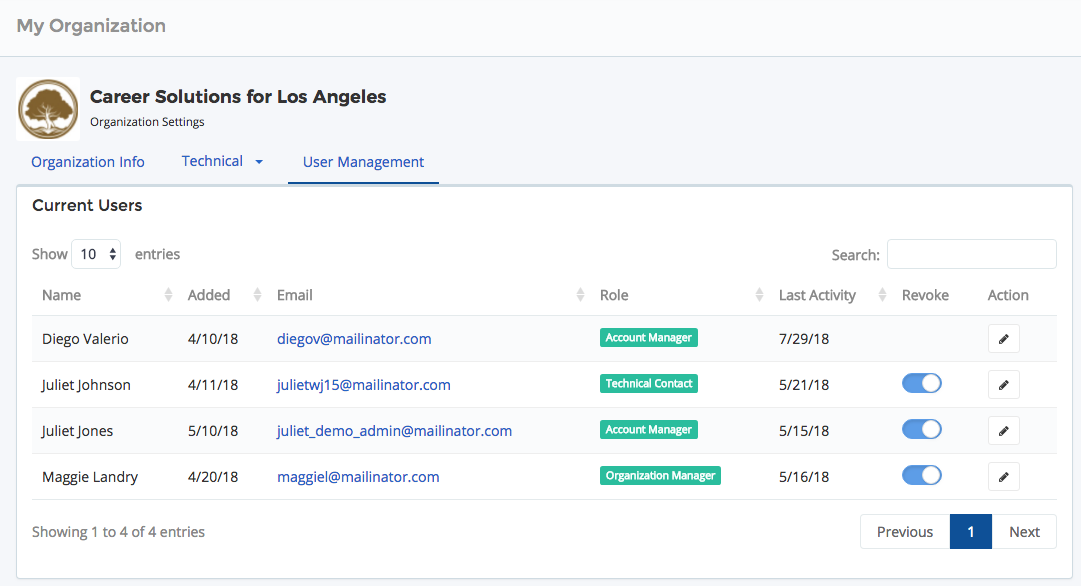
- Under Invite User, add their email address.
- Select a Role for your user.
- Customize the default email message if necessary.
- Click Send Invite button.
Note: invited users will not show up on your user list until they’ve accepted your invitation.
Step 4: Invite Your Discoverers and Clients
Prerequisites
Complete Steps 1, 2, and 3 above before starting to use a Career Key assessment with your discoverers and clients. You’re ready to publicize CKD or the CDP !
Visit Manage CDP Clients for CDP specific examples.
Two Ways Individuals Access Career Key Assessments
- Individuals log into your website and you direct them to the page hosting a Career Key plug in.
- Individuals receive an email invitation from you, with an access and activation link.
#2 requires that you create a group in Career Key Central and upload discoverers’ information into it, which we cover next. Once you’ve created a group this way, you can send all its members an email inviting them to start.
To see CDP specific examples, go to Manage CDP Clients.
Option #1:
PROS: Easiest to administer – all you need to do is publicize the URL to your discoverers and clients where the Career Key assessment plug in is hosted.
CONS: Anyone signed into your intranet can enter and take the assessment if they are shown or given access to your assessment plug in URL. If you want to limit access, you can alleviate this issue by not publicizing the link. In all cases, only individuals signed into your intranet have access.
Option #2:
PROS: More restrictive – Only individuals with an activation email will be able to take the assessment. This may be preferable for a defined class or workshop.
CONS: It’s a little more administrative work. A counselor needs to create a group, upload a student roster and send an Invite to Start email from Let’s Connect. Once a person’s information is uploaded into our system, they are “registered” for purposes of your subscription and count against your quantity, even if they later do not take the assessment. Reassignment of unused assessments is on our product roadmap.
Create and Manage Groups
- Select Create & Manage Groups from the Left Navigation Menu.
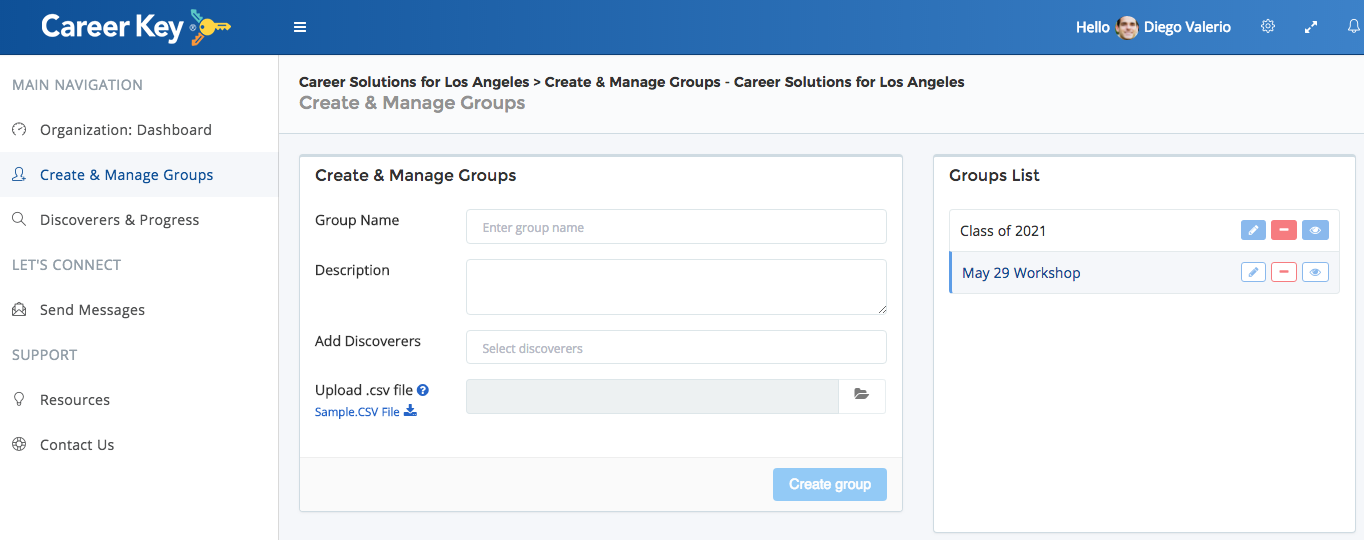
- Add a Group Name and Description for your group.
- Upload a .csv file with your group participants. The .csv file contains the following headings in this order: First Name, Last Name, and Email. To make it easy, you can download the sample .csv file and add your data to it.
- Click Create Group button.
Once you’ve uploaded a group, you can send the Invite to Start message after installing the CK plug in on your site.
Communications / Messages to Discoverers and Clients
Communications are generally initiated from the Discoverers & Progress List or CDP Clients page. The process is similar for both.
- Select Discoverers & Progress or CDP Clients page from the Left Navigation Menu.
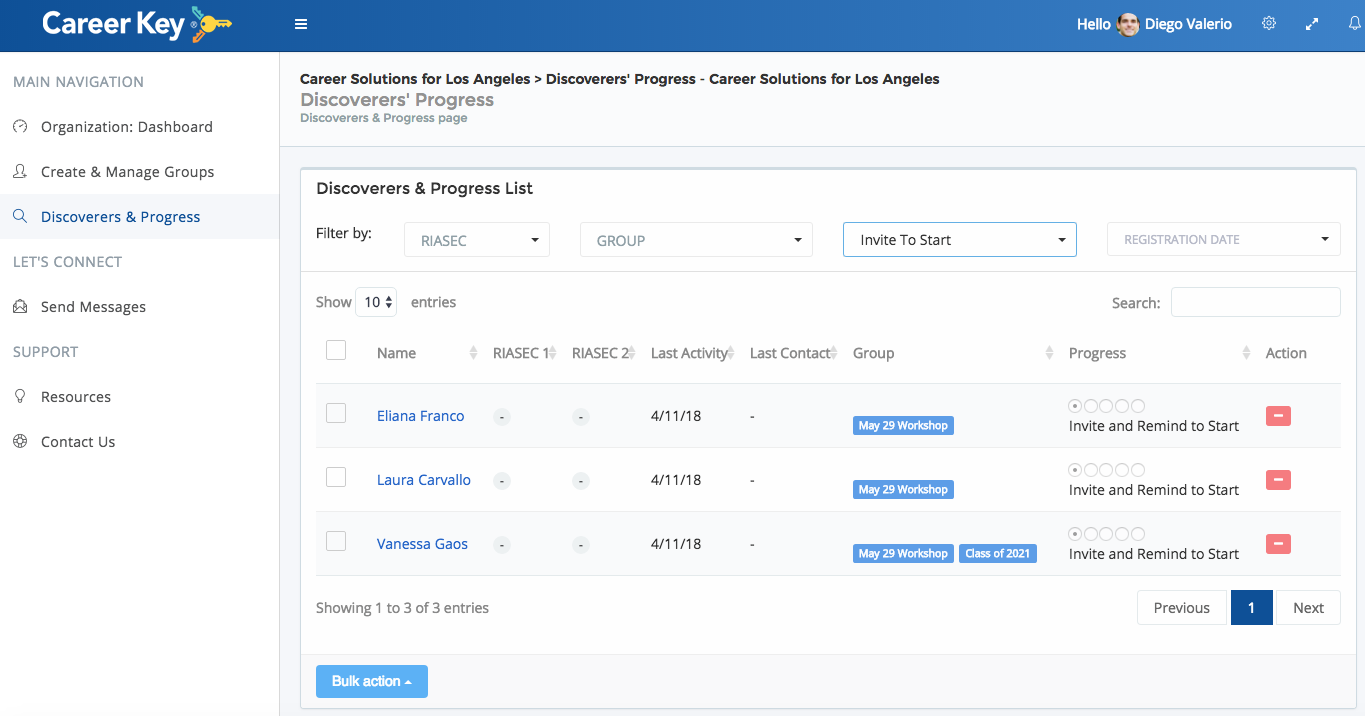
- Select the Group you’ll be working with to load that group’s discoverers. You can filter by the top two RIASEC personality types, Last Activity, Progress, and Registration date, the date the discoverer started CKD.
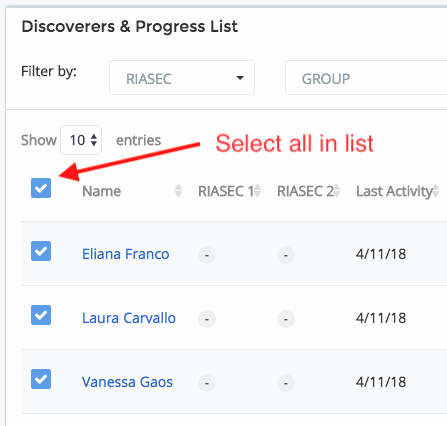
- After selecting your group and applying your filters, use the check boxes to select specific discoverers or the top check box to Select ALL Discoverers in the list.
- Select Bulk Action/Let’s Connect/Invite load the starting email message.
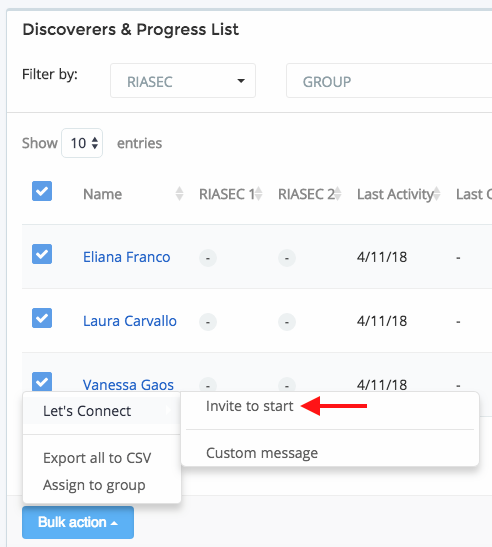
- A sample email to your discoverers will load. You can customize it as much or as little as you like.
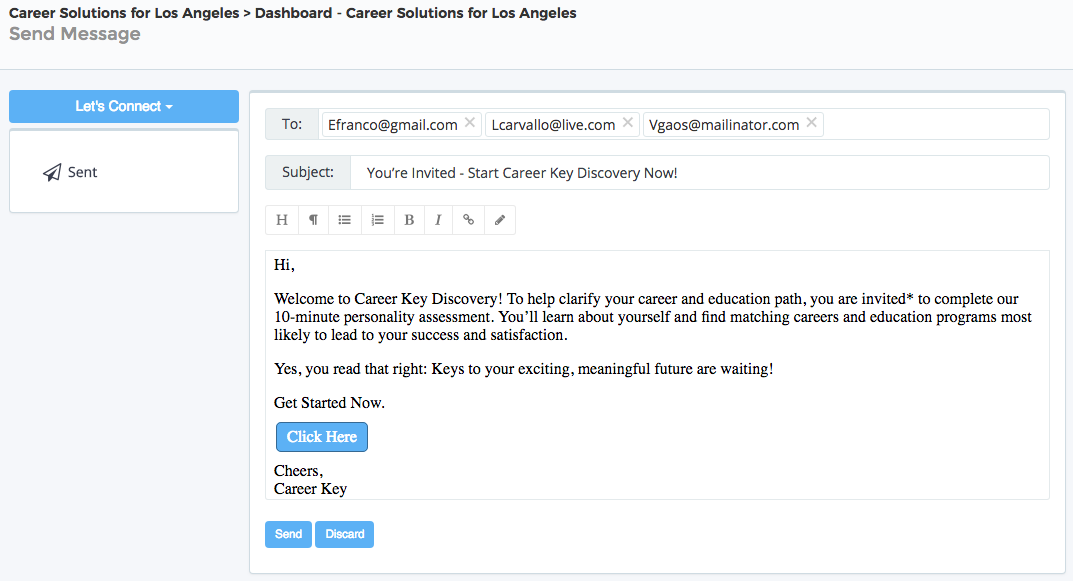
- Click the Send button to send or the Discard button to discard your email.
After your first message has been sent, you can filter discoverers by where they are in the Discovery Process as well as their personality type to continue to guide them through Discovery.
Career Key Discovery Email Templates
There are 5 progress milestones in CKD: Not Started, Assessment Not Completed, Completed Assessment, Started Profile, and Returned to Profile.
Email templates are included for each progress milestone:
- Invite to start
- Reminder to start
- Reminder to add options to profile
- Kudos for progress
- Offer to help
- Custom Message
Bulk Actions include Let’s Connect, and Export.
Career Decision Profile Email Templates
Email templates are included for different needs:
- Invite to start
- Self-help
- Brief Staff Assist
- Individual Case Managed
- Custom Message
Bulk Actions include Let’s Connect, and Export.
Assign Discoverers and Clients to a Counselor
You can assign individuals to a counselor by groups.
- To assign just one person, locate them in Discoverers and Progress and assign them to a group.
- To assign a whole group of people, go to Create and Manage Groups. Click on the group view in the Groups List, then click on the Assign button below it on the line that says, Currently Assigned Users.