Table of Contents
Are you looking for more information on advising clients based on their career decision status? Visit Explore Client Indecision.
Time to Complete
6 minutes
Overview
In Career Key Central, there are three main places where you manage CDP clients’ information and engage with them:
- Main dashboard table – CDP Clients,
- Client Detail page, accessible from the table,
- Create and Manage Groups, and
- Let’s Connect.
Each gives you a different level of visibility and features to take action. If you take a moment to familiarize yourself with them, you’ll get the most of Career Key Central.
For a quick video overview, watch 6 Advising Tasks in Career Key Central.
Takeaways
- Learn how the main dashboard table is your gateway to action
- Learn where to find detailed client results
- Learn how to use Let’s Connect to engage with and follow up with clients
- See examples for first-time engagement with clients and follow up
- Become familiar with using groups to stay organized
- Learn how to export client data to a .csv file
CDP Clients: Main Dashboard Table
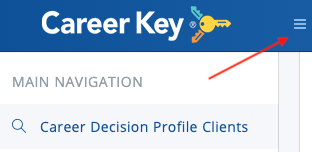
When you first sign into Career Key Central, we show you the big picture of your account activity in one table, CDP Clients. As you become familiar with CK Central, don’t forget to click on the “hamburger” at the top left (to the right of the Career Key Central logo) to hide the left-hand navigation.
The whole table will stretch and be displayed.
Filters
We offer 3 filter options,
- Group
- Service level
- Progress (not completed, pre or post intervention)
- Scale and Score
- Date Range
You can create groups or leave clients unassigned. To learn about how we estimate and assign service levels, read Screen for Career Readiness.
Follow up with clients
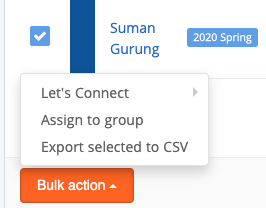
When you use a filter to select a set of clients, you can click on the “Bulk Action” button at the bottom of the table. Then select Let’s Connect to send an email message.
Retakes for Pre/Post measurement
Each client is allowed to take the CDP twice. When you use the CDP as a pre and post measure, each client will have two sets of results.
When you click on the client’s name to show their Client detail, we list each assessment by date and you can navigate between them by tab. When you export clients’ data, both sets of CDP results are downloaded.
Export client data
Use a filter to select a set of clients, then click on the “Bulk Action” button at the bottom of the table. Select export to download their data in a .csv file.
CDP Client Detail
If you are going to advise a client and follow up with them, you will want to look up and review their CDP results. Use the search box to the right to look up a client by name. Click on the name to show the Client Detail page.
Client Detail
At a glance you see the person’s
- Estimated service level,
- Results for all scales, including advice Career Key gave the client in their report
- Other Factors: if the client answered optional fill-in questions, we display that to you, and
- Suggestions to advisors for following up.
For more information about how to interpret scores, visit Explore Client Indecision. For more about how we estimate service levels, go to Screen for Career Readiness.
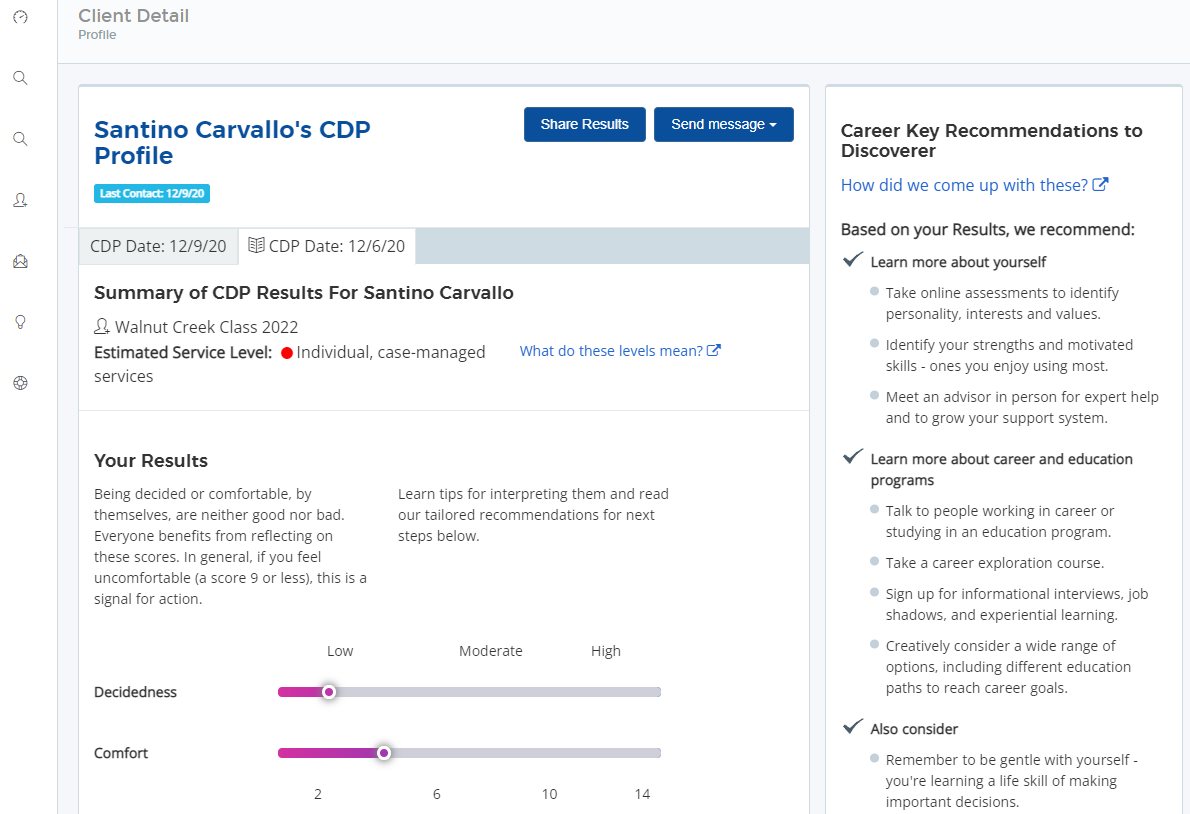
While in Client Detail, you can also take the follow actions,
- Share the results via email with someone else, or
- Send an email message via Let’s Connect to the client.
Engage with Clients and Send Relevant Follow Up with Let’s Connect
In the CDP Clients table, you can see all your organization’s clients in one list. You can filter and sort the list by:
- Name
- Group
- Date
- Service Level
- Scale and Score
Either select 1 client or an entire set based on your sort. You can then send a targeted, relevant message to them using Let’s Connect, CK Central’s email engagement hub. It offers 4 email templates and a custom message option:
- Self Help
- Brief Staff Assist
- Individual Case-managed
- Retake CDP
- Custom Message
You can use any template and edit them as needed.
First time engagement with clients
When you start using the CDP with clients, you need to decide how to introduce them to it and have them take it. (also see Set Up My Organization). You have 2 options to have clients take the CDP.
- Individuals log into your website and you direct them to the page hosting the CDP plug in.
- Individuals receive an email invitation from you, with a link to your CDP plug in.
#2 requires that you create a group in Career Key Central and upload discoverers’ information into it, which we cover next. Once you’ve created a group this way, you can send all its members an email inviting them to start.
Option #1:
PROS: Easiest to administer depending on how you’re using the CDP (see CONS) – all you need to do is publicize the URL to your discoverers and clients where the CDP plug in is hosted. If you don’t know the web URL to share, click on the top right Gear icon, select My Organization, and then the Technical tab.
CONS: If you have a group where taking the CDP is a requirement, you will not as easily be able to see who has not taken it and therefore needs a reminder. Also, anyone signed into your intranet can enter and take the assessment if they are shown or given access to your assessment plug in URL. If you want to limit access, you can alleviate this issue by not publicizing the link. In all cases, only individuals signed into your intranet have access.
Option #2:
PROS: More restrictive – Only individuals with an invitation email will be able to take the assessment. This may be preferable for a defined class or workshop.
CONS: It’s a little more administrative work. You need to create a group, upload a student roster and send an Invite to Start email from Let’s Connect. Once a person’s information is uploaded into our system, they are “registered” for purposes of your subscription and count against your quantity, even if they later do not take the assessment. Reassignment of unused assessments is on our product roadmap.
Examples
Here are a couple of examples of an advisor using these templates with incoming freshmen in a First Year Experience (FYE) program.
Example 1: First Engagement – Taking the CDP is a requirement for clients in a program
- Create a CK Central group (see next section) and upload a .csv file list of students in the FYE program
- Filter for that group and select those clients In the CDP Clients main dashboard table
- Select bulk action at the bottom to select Let’s Connect and choose a template email option
- After email template opens in Let’s Connect, send invitation email
Example 2: First Engagement – Taking the CDP is recommended but not required
- Publicize to clients the CDP’s availability and Hosted Plug In URL (location in Technical tab in My Organization) via organization’s normal communication channels
- Follow up with clients after they appear in the CDP Clients dashboard table (see next Example)
- Create groups based on certain types of client needs for more focused attention (see next section)
Example 3: Follow Up – Individually and by service level as needed
- Filter by service level and select those clients In the CDP Clients main dashboard table, OR choose a specific client
- Select bulk action at the bottom to select Let’s Connect and choose a template email option
- After email template opens in Let’s Connect, send email specific to that service level. Customize and edit as needed.
Example 4: Follow Up – To request retake as part of a pre/post study
- Filter by group or date range and select those clients In the CDP Clients main dashboard table, OR choose a specific client
- Select bulk action at the bottom to select Let’s Connect and choose the Retake CDP email template option
- After email template opens in Let’s Connect, send email that contains link to retake the CDP. Customize and edit as needed.
Stay Organized: Create and Manage Groups
Organizing your clients into groups allows you to:
- Set up freshman orientation career exploration class before the semester begins
- Track a group of clients by a common characteristic, like student graduation year
- Track a group of clients you would like to administer the CDP to twice for a pre/post study
- Assign a group of clients to a particular counselor
- Download client data for a particular group and return to that group later to repeat
You can handle clients in two ways, depending on whether you’ve identified them ahead of time, or they organically find and start using the CDP app on your website. You can also assign a client or group to a particular counselor at any time.
NOTE: In CK Central, we use the terms client and discoverer interchangeably as we have two applications that share the same features.
Planning Ahead: Invite Clients via Email
For programs where you know ahead of time who the clients will be, like a freshman orientation class or a workshop, you can create and upload a group of clients using a .csv file.
Organizing As You Go: Create a Group from Existing Clients
Clients may also organically find (or you direct them to) the CDP app on your organization website through the site’s navigation. In that case, as they complete the assessment, clients will appear in your Career Key Central. These discoverers are not in a group and are unassigned to any of your organization’s users (Manager, Counselor).
As they arrive, you can assign them either individually or as a bulk action to a group. Once you have a group you can assign that group to a Career Key Central user.
Assigning Groups to Your Colleagues (Users)
Using groups and assigning them to your organization colleagues (users) is easy. That way they can focus on viewing and supporting the clients most relevant to them.
You can assign each group of clients to one or more Career Key Central users, like a counselor.
NOTE: To assign a user, that person must be activated in Career Key Central. In Create and Manage Groups, when you click the “Assign” button, you will see a list of active users. If your person is not listed, you need to invite them and they need to accept. (see inviting users in Setting Up My Organization)
Export Clients’ Data
When you export clients (also called discoverers) to a .csv file, it contains the following information:
- Name, email address (if provided) and unique identifier. If the organization provides an ID for clients when they sign in, that’s the unique ID our system uses. Otherwise, we assign a unique ID to them.
- Scores levels for all scales as a reference
- List of discoverers’ scores and service levels
- List of discoverers’ detailed scores (raw data)
- Retakes for per/post studies are shown – the client retains the same Career Key unique ID
- Any assigned groups
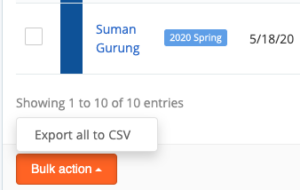
At the bottom of the CDP Clients main dashboard table, click on the Bulk Action button.
If you just want to export a certain number of discoverers, filter and select them. Then click on the Bulk Action button at the bottom of the page and choose “Export selected.”
If you want to export ALL your discoverers, don’t make any selections and just click on “Export All.”
Related Articles:
Support > Set Up My Organization
About the Career Decision Profile > Explore Client Indecision
About the Career Decision Profile > Screen for Career Readiness