Table of Contents
Time to Complete
5 minutes
Overview
For an organization’s website administrator/technical contact only
In order for your clients to access the Career Decision Profile (CDP), you need to host the CDP plug in on a single page application comprised of just one html page. It is the same process for Career Key Discovery (CKD) except for configuration (Step 3) and client values.
Once you complete installation and you link visitors to that page, clients will be able to access the CDP, and their assessment results and data will appear in the customer action portal, Career Key Central. That is where your organization’s administrators and advisors will be able to view clients’ data and engage with them.
Start by reviewing the prerequisites to make sure you have all the information to get started.
Takeaway
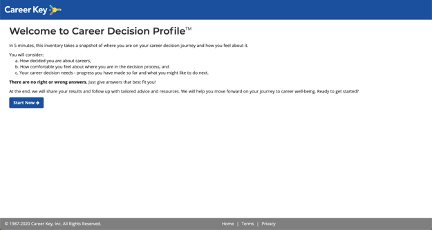
Learn how to install a CDP plug in on your website.
Prerequisites
You need to know the following:
- The exact URL where you want to host the plug in. Only registered users of your website should have access to the page.
- How your organization wants to configure the plug in so that the CDP assessment shows discoverers the right content. (Default: No co-branding, no customer URL given to clients to see additional resources your organization offers them) To see more options, visit Resources > Set Up My Organization. You may need to request this information from your organization’s primary contact on the Career Key account.
- How to get the values in the code for first name, last name and email address of the client user who is logged in to your website. If you want to use different user values or create a custom interface, then contact us at support@careerkey.org.
- How to host an html page either in your website or separately.
- How to provide the values for first name, last name and email address of the user to a JavaScript object in a new html page.
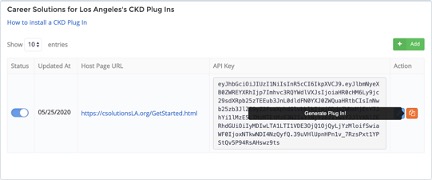
Step 1: Sign In & Add a Plug In
As a Technical Contact, you receive an invitation to activate and sign into your Career Key account. Once signed in, you will see a dashboard for managing CKD Plug Ins.

If you are not in the technical contact role, you can access the same information by clicking on the top right gear icon, choosing My Organization, and clicking on the Technical tab.
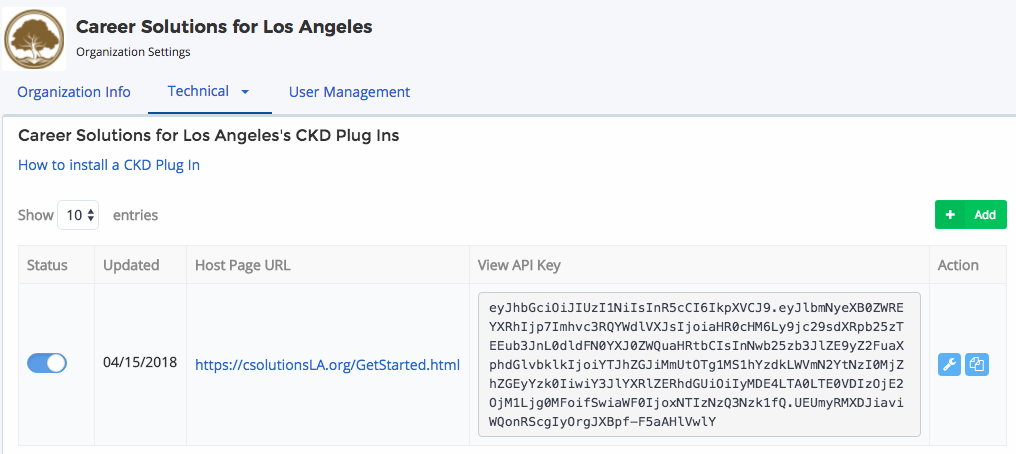
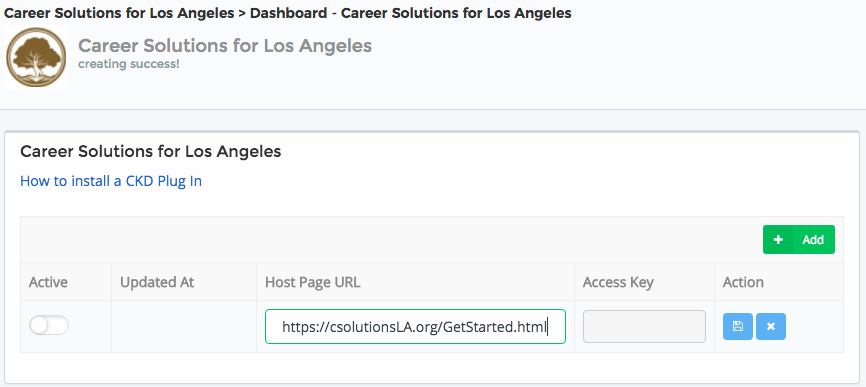
Step 2: Add Plug In, Host URL and Save
- Click on the green Add button to get started adding a plug in.
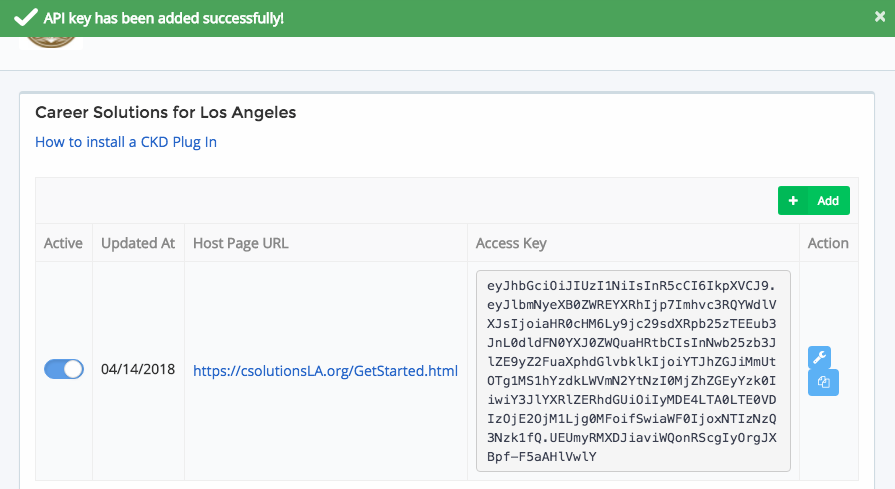
- Enter the “Host Page URL” where you will be hosting the plug-in/widget and click on the ‘Save’ icon. The URL you enter must match exactly what you are using to host the plug in, otherwise it will not work.
After you click the Save icon, the API Access Key is automatically generated.
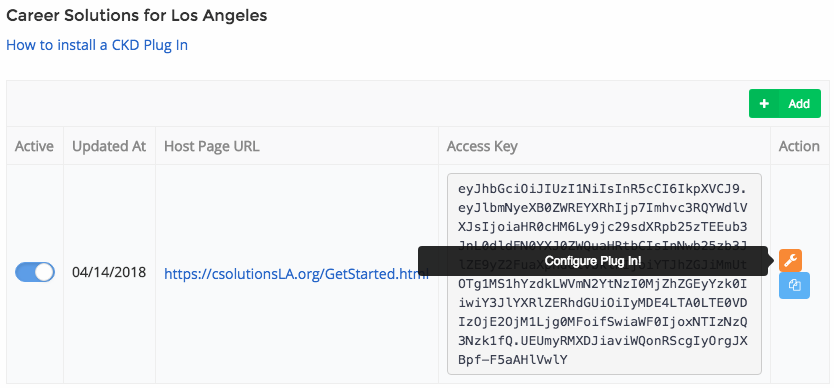
Step 3: Configure the Plug In
Configuration controls the CDP content your clients see. The person who invited you to Career Key, your organization’s primary contact, should let you know if they want the plug in configured differently than the default settings. To see them and to make any changes, click on the Configure icon.
Here are your current options (more options will be added in the future):
Here are the current plug in configuration options (more options will be added in the future):
- Language,
- Enable FallBack Language,
- Select Fallback Language
- Show Additional External Barriers section
- Theme Color (for co-branding)
- CDP Resource URL (links to your site’s CDP resource page for discoverers)
- Plug In Logo (for co-branding)
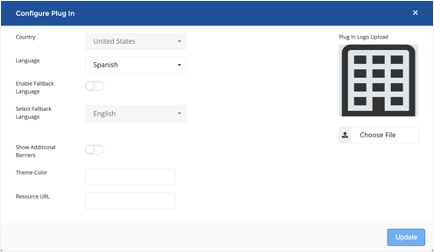
Make any changes, and click Update at the bottom of the screen.
NOTE: if you make any changes in a plug in’s configuration after clients have started using the CDP, previous users may lose saved answers to questions depending on the new configuration selection. If previous clients answered questions in the additional External Barriers section, and you changed the configuration to remove that section, those answers will disappear from the client’s results.
Step 4: Generate and Copy Code Snippet for Hosting
Click on the Generate plug in (widget) icon.
A popup will appear as shown below. Now click on the “Copy” button to copy the plug-in code content.
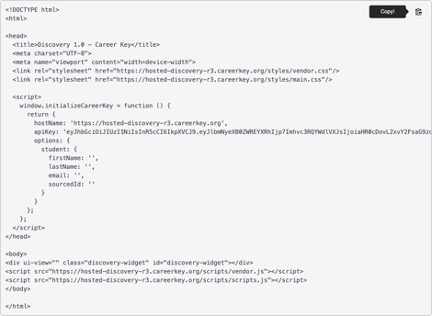
Now paste it into your favorite text editor.
Save and host the plug in on your HTML page.
Step 5: Pass Your Discoverer Values to the Plug In
For populating the discoverer details in the plug in, you have two options:
A) Pass the values from your application via cookies. Make sure you name the cookies parameters as cdp_firstName, cdp_lastName and cdp_email respectively,
OR
B) Write a logic to populate the firstName, lastName and email in the widget dynamically.
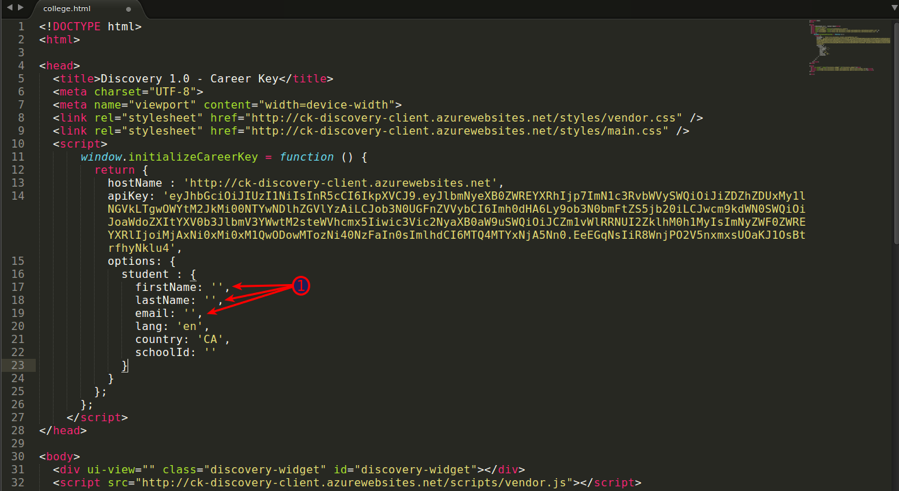
Please make sure not to change anything else in the plug in code or it will not work. If your site’s user registration uses different values than a person’s first and last names, and email address, you will need to take a more custom approach. Notify us at support@careerkey.org and tell us what you need to do and we will let you know if we can support your approach. Please allow 2-5 business days for us to reply.
Step 6: Test and Publicize to Your Organization Team
Once your plug in displays correctly on your web page, test it from a sample discoverer’s perspective using a test user on your site. Notify your organization that the plug is installed and ready to publicize.
Related:
Support > Manage CDP Clients
Support > Set Up My Organization
About Career Decision Profile > How the Inventory Works